Paul Heinz

Original Fiction, Music and Essays

Filtering by Tag: vinyl

Build Your Own Record Rack - repost

(NOTE: this is a repost from June 15, 2023, but I wanted to reintroduce this topic as a companion to a discussion from this week’s episode of 1000 Greatest Misses, a podcast I host with Christopher Grey. If you own vinyl, this may be right up your alley).

I’m not a naturally handy guy, but over the years I’ve managed to take on some modest home improvement projects with a degree of success, mostly the result of YouTube videos and frantic emails to my exceptionally handy friend, Rick.  Last March when it became apparent that the pandemic would result in a lot of unwanted time at home, I decided to overcome my typical trepidation and take on a new project, one I’d been grappling with for some time:  building a few shelving units to store my growing collection of vinyl records.  I’d been searching for a replacement of my plastic-bins-scattered-around-the-basement approach for quite some time, but nothing on the market satisfied my three criteria:  forward facing, attractive and inexpensive. 

Enter, the Google search.  Actually enter dozens of Google searches. And lo and behold, several pages deep into one of my explorations, I came upon a marvelous blog post called “I Built a DIY Vinyl Record Shelf, And you Can Too!”  This sounded right up my alley.  The post was over seven years old, but the concept was timeless:  build a great-looking unit that holds around 500 records with one sheet of 8x4 plywood.  Fantastic.

The author of the blog got his idea from what is now a decade-long thread on AudioKarma, a website I’d never heard before but whose entry is a treasure trove of information from dozens of helpful contributors.  It all started with a great concept and has since evolved to include every possible variation you can imagine, with multiple draft designs that accommodate different needs.  If you’re interested in building your own rack, I strongly encourage you to read the entire thread before you begin.  I did not, and wish I had.  It may take you several hours, but it’ll help you determine in advance which features are important to you and which design works best.  Had I read these comments in full I would have avoided a few mistakes along the way.  As it is, I built two identical racks, and then a third of my own design that includes record storage on the bottom and bays for a receiver and turntable on top.  None of my three projects went perfectly, and my lack of craftsmanship certainly reared its ugly head from time to time, but I learned a lot about woodworking and ultimately made decent-looking alternatives to the plastic bins I’d been using for years.

Along with screws, glue, casters, sandpaper, and polyurethane, lights, etc., I figure each unite costs somewhere around $100.   Not too shabby!

IMG_20200415_163133223.jpg
IMG_20200615_143225240.jpg
IMG_20200615_135340799.jpg
IMG_20200414_135716145.jpg
IMG_20200615_135326304.jpg

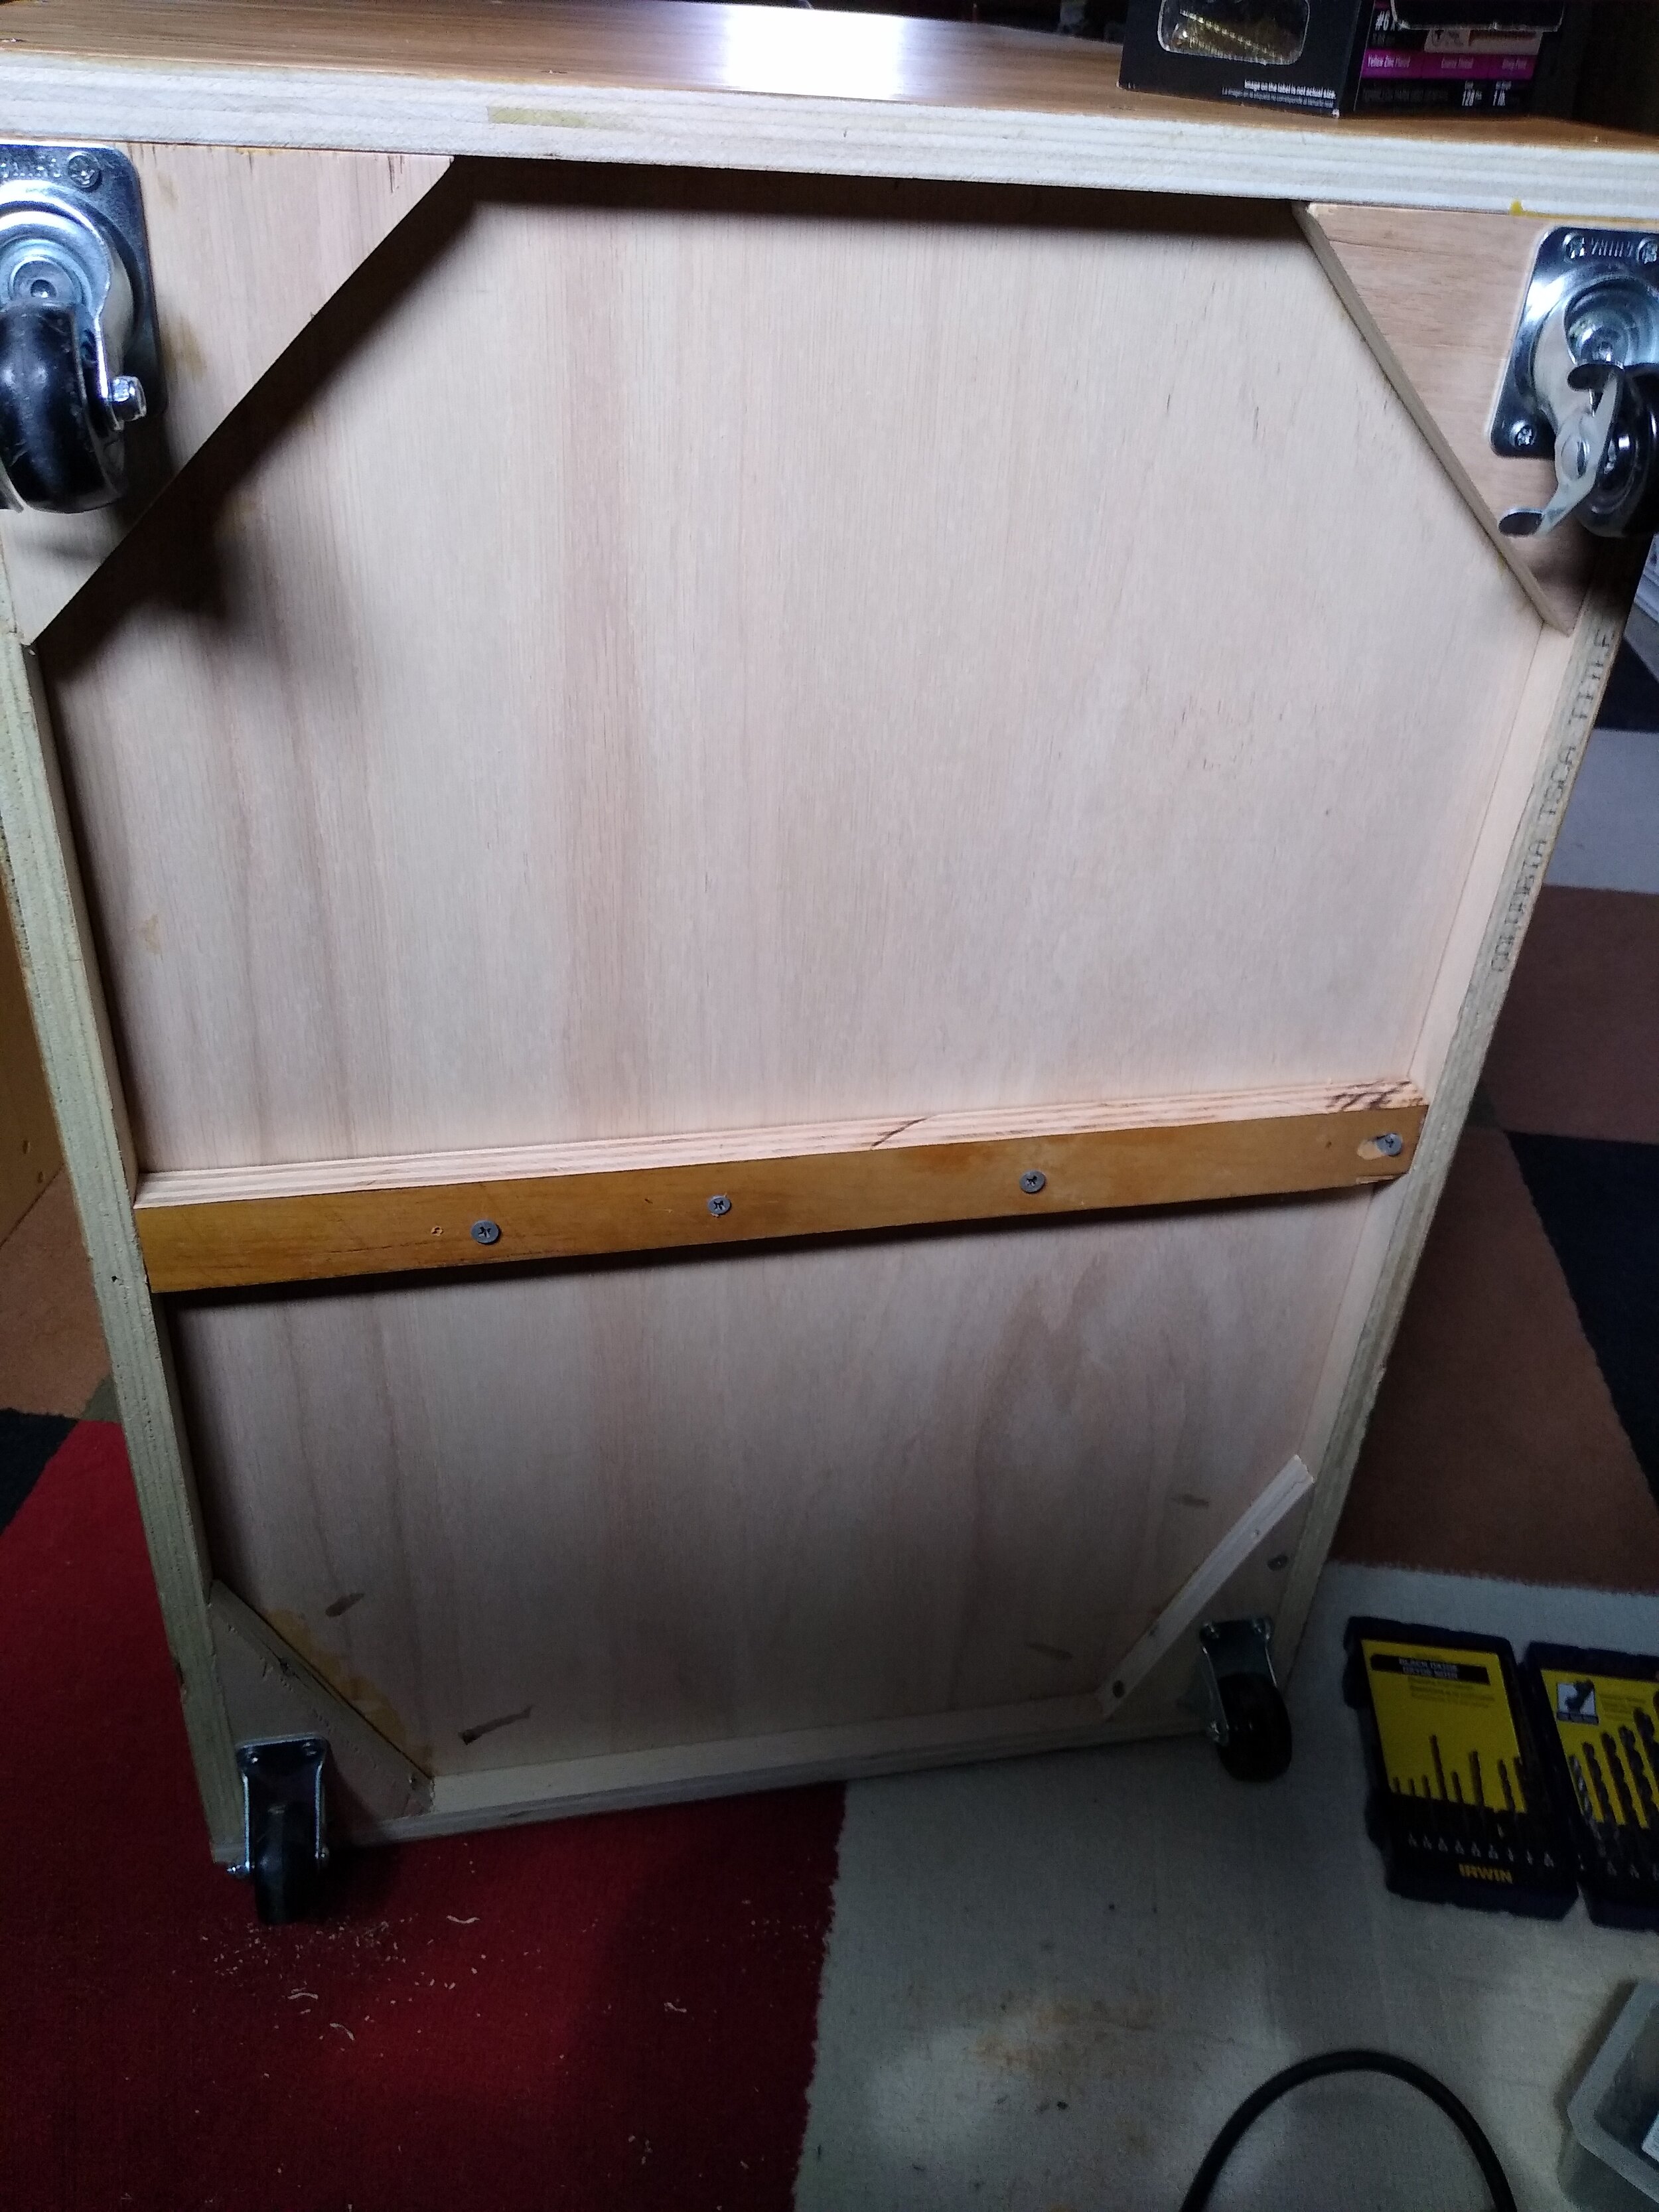
Above: records will fill the bottom eventually. Far left: speaker stands that I built to practice using a pocket hole jig. Left: extra support for the bottom shelf.

Here are a few things you may find helpful:

1)     Beware cutting your plywood at the store.  The guys at Home Depot were well-meaning, but their cuts of my red oak plywood (around $53) with a dull an imprecise cutting tool ended up shredding my wood something fierce.  It took a lot of energy and frustration to work around the most dreadful-looking cuts.  If you have a friend with a truck or a van, consider doing this at home.

2)     Buy or build a square jig to hold your plywood together at right angles.  I built one very similar to the one in this video: https://www.youtube.com/watch?v=HPA8FDTcfcE

3)     Get a table saw or borrow one.  I did not and it showed, because even though I used a guide with my circular saw, I was never able to make my cuts absolutely perfect, resulting in slight gaps and mismeasurements that affected the final project.  I’m still happy with my units, but they could have been a bit better. 

4)     Since being able to move your record rack once it’s filled with records is key, definitely include casters in your design.  I purchased reasonably-priced 90-pound casters from Home Depot and they work fine.  Don’t forget to include a few that swivel and lock.

5)     Use a counter sink to hide your screws or use a pocket hole jig.  I did the former from the first two racks I built and pocket holes for the third unit along with a set of speaker stands I built (these actually turned out the best of all of my work).  I loved using my Kreg Pocket Hold Jig 320 and will find new uses for it in upcoming projects I’m sure.

6)     Use wood glue for all of your wood joints.

7)     Buy a bunch of clamps, including a few trigger clamps for ease of use and a few clamps that are long enough to accommodate your record bin.  I think mine are 48 inches, and they were hugely helpful.

8)     Consider adding supports for the shelves.  Records weight a lot, and though it might not have been necessary, I did add a cross-bar support for the lower shelf and perimeter supports for the top shelf.   If nothing else, they give me peace of mind.

9)     Be especially careful with the top shelf as this is the most visible.  On the last rack I made that’s housing a turntable on top, I ended up with gaps along the edges that required the use of wood putty, and it looks pretty bad.  So bad, in fact, that I decided to purchase a bunch of rock band stickers from RedBubble to hide my work!  I love the stickers, but they were not part of the original design.

10)  Which reminds me, consider decorating your racks with stickers!  This was a helluva lot of fun, and it requires no carpentry skills.

11)  If you don’t want to stain, don’t.  I personally hate using stain because I never like the way it turns out – just another one of those handyman skills I haven’t yet mastered.  I kept my red oak plywood bare and used three coats of polyurethane to protect it and give it a bit of a sheen.  Looks great.

12)  Don’t fret so much about how to best apply polyurethane.  I stressed out about this because everyone had an opinion and almost none of them were consistent.  Put a few coats on, sand lightly, put another coat on, and you’re good to go.  It’s just polyurethane.  It’s not life and death.

13)  Consider using real wood iron-on veneer.  I had no idea this product existed, but it’s another one of those great tidbits offered by the AudioKarma gang.  It’s an absolute bitch to work with in my opinion because it’s wider than the edge of the plywood and therefore needs to be trimmed.  Nothing I used – a trimmer designed specifically for this task or just good old sandpaper – worked well.  It either just folded the veneer or disrupted it enough to lift it off the plywood despite the adhesive.  I eventually got the job done and it looks great, but it was an unpleasant process. 

14)  Install LED lights for the bottom racks or your records are going to be hard to see.  This part of the project was easy!  I purchased these stick-on lights from Amazon and they work great. 

15)  Use record dividers for a professional look.  There are a bunch of options out there, mostly overpriced or formatted incorrectly, but I like the option I found at Amazon along with a white ink Sharpie.

I’m probably missing a few additional pieces of advice, but by scanning the AudioKarma thread you will have a lot of great ideas that people of shared over the years.  Happy building!

The Film, Avalon

If pressed to name my favorite movie of all time, I’ll either answer Rear Window, Hitchock’s 1954 suspense thriller, or Avalon, Barry Levinson’s 1990 family biopic. The latter barely registered at the box office when it was released during my final semester of college, but its absence from Best Picture contention a few months later was – in my mind – a glaring omission. I thought it was cinematic perfection, the very reason we have “the movies.” It’s also the kind of film that is no longer made. But back in 1990, Levinson, riding high after his Oscar win for Rain Main two years earlier, was largely given free rein to write and direct whatever he wished, and drawing from his own childhood, he struck gold with Avalon, a tale about the fragmentation of the family – and perhaps of society itself – after the rise of television and suburbia.

My roommate Mark and I had seen a preview for the film on TV, and we decided to devote a weekday evening to watch it at the theater near the capital in Madison, Wisconsin. The addition of a couple of young women – one of whom was transporting us to and from the movie – initiated a mild debate about which film to see: Avalon or Welcome Home, Roxy Charmichael. The latter wasn’t without merit: the poster offered an enticing Winona Ryder dressed in a hot pink dress, revealing quite a lot of leg, but cooler heads prevailed, i.e., Mark and I had made our decision and we weren’t budging, a dangerous position given the potential ridicule we might have garnered if the movie was a dud. Fortunately, by film’s end, all four of us were either suppressing tears, or – in the case of one of the women we were with – outright blubbering. It was one of those movies that struck a chord, with its themes of family, loss, and legacy.

No less important than the film itself was the haunting score by Randy Newman, which, although nominated, didn’t earn Newman his first Oscar win, however deserved (he could have just as easily won for his score for Awakenings that year, but that wasn’t nominated, and his first Academy Award win wouldn’t occur for another eleven years). The music from Avalon stayed with me for months afterward, actually waking me from dreams, all without the aid of additional viewings. I’d heard the score once, and my subconscious remembered it. It was that good. 

I didn’t see the movie again until the fall of 1992, when I recorded a VHS tape it off of cable, and I purchased the soundtrack on CD around the same time, eventually transcribing some of the themes from the score into a “piano highlights” piece that I still have. Nearly thirty years later, while shopping at a record store in Columbus, Ohio, my son came across a vinyl copy of the soundtrack, and I came to learn that Reprise Records released the record in 2020 as part of its “The Sound of Movies (…and Television!)” series, a noble endeavor for the movie/vinyl enthusiast. I now own Avalon on CD, DVD and vinyl, and the movie poster adorns my basement wall. I’ve seen in probably twenty times or so, and over the years I’ve enjoyed showing it to my children and a few friends who I felt might respond well to it.

In 2015, Levinson and Newman were interviewed about the film during its 25th anniversary, and it’s well worth a read if you’re a fan of the movie or the score, or both.

Here’s hoping the movie gets more recognition in retrospect than it did upon its release.

An Ode to Compact Discs

Just a few weeks after I touted the benefits of owning physical LPs, author and journalist Rob Sheffield writes in Rolling Stone this week about the resurgence of one of the most assailed forms of music media: the compact disc. The redheaded stepchild of music formats, Neil Young has equated listening to digitized music to sensory deprivation and torture. Ouch!

But while I’ve never understood store-bought cassettes, even back in their hey-day and especially today as they make a perplexing comeback in used record stores, I totally get why CDs are still a thing, Neil Young’s assertions aside. As Sheffield writes: “Compact discs were never about romance — they were about function.”

I and most other music connoisseurs spent years in the 2000s converting their CDs to easily stored MP3 files for use in iPods and the like, but unlike many, I stopped short of actually removing the physical products from my home. Thank goodness, because I really do like having physical CDs to play, especially when I’m driving in my Mazda, which will unfortunately likely be the last car I’ll ever own that’s equipped with a CD player. I still own the 400 or so that I amassed over the years, including my first purchases from 1986, and I still kick myself for having sold or gotten rid of around fifty CDs back in the 2000s. There’s still something alluring about playing a CD in its entirety, uninterrupted. In terms of functionality coupled with pretty damn-good quality, CDs can’t be beat.

Unless you consider streaming, which – let’s face it – wins in the functionality department and can sound pretty great if you want it to, but Sheffield echoes (and states more eloquently) some of the same arguments I made last week about streaming. He writes:

“…streaming is not a ‘place,’ but a barrage of constant options that many fans find less optimal when you’re in the mood to actually concentrate and listen. You’re probably also streaming on a device that’s nagging you about messages you need to answer right now.”

It’s the same premise that people have made all along: that there may simply be something very human about the need for tactile interaction with one’s environment, and in a culture that’s downgraded music and other media to something disposable, it’s natural that the pendulum would slowly shift toward owning physical products. CDs aren’t perfect, but they at least include liner notes and cover art. As if that’s not enough enticement, I saw scores of them at a used furniture sale last week for 25 cents apiece!

And for all you vinyl purists who lean toward environmental causes, Sheffield notes that for all the hubbub people threw at record companies for housing CDs in grotesque longboxes back in the 80s and 90s, “…the tables have turned – now if you buy an LP online, it’s shipped in a package that’s basically six longboxes.” 

Well played.

For those who aren’t familiar with Sheffield, he’s a hell of a writer, and among music geeks is revered alongside other venerated music-themed artists such as author Nick Hornby (High Fidelity) and filmmaker John Carney (Once, Begin Again, Sing Street). Sheffield resonates to a certain type of person: often male, semi music-obsessed, a bit insecure, and one who occasionally likes to bathe luxuriously in his own heartache. His books Love is a Mix Tape, Talking to Girls about Duran Duran, and Turn Around Bright Eyes are mainstays for many music nerds. I highly recommend each of them.

Organizing, Records and Discogs

When the pandemic started last March, much of the nation went into house-organizing mode, as people gathered never-worn clothes from bedroom closets and outgrown toys from playrooms, making room for other purchases that will one day need to be discarded.  The pandemic may have facilitated this organizing trend by forcing people to spend countless hours inside their homes, but I think a lot of it came down to control: giving us some semblance of power in a world that increasingly seemed to be careening towards a path of its own demise.  I think that’s what most organizing constitutes: a chance to regain control in an otherwise uncontrollable world.

While others were discarding, I was adding.  Just as the state of Illinois was shutting down last spring, I made regular trips to Home Depot to build three record racks for my growing collection of vinyl, and while the racks achieved their purpose of properly displaying my albums in all their glory, I soon wanted even more control.  I wanted them cataloged.

IMG_20210106_105614402.jpg

Enter Discogs.

Websites aimed to catalog aspects of our lives are nothing new.  Letterboxd tracks the movies we’ve seen (or haven’t seen yet), Goodreads does the same for books, Untappd for the beers you’ve sampled.  As someone who has made lists all his life, who when asked what my favorite movies are can immediately rattle off ten titles, I find these websites to be a Godsend, a way to transform scraps of paper or poorly organized spreadsheet files into fun, interactive activities that facilitate sharing content with others who relate to my obsessions.

There are plenty of options for music collector, but Discogs appears to be the site of choice for the folks I know.  It has its quirks and limitations, but after spending a week or so entering data, I’ve managed to inventory all of my records, CDs and concert DVDs nicely in the cloud and I’ve organized them even better on a spreadsheet that I can manipulate however I choose.

A few details.  If you’re a vinyl collector for whom its important to properly identify the specific pressing of each record you own – and there are reasons why this might be important – the endeavor of cataloging your collection is going to cost you loads of time.  For me, I was happy just to note that I owned a particular album and not that it was a particular reissue of a particular year.  This posed a problem, however, because Discogs attempts to estimate the monetary value of your collection – a nice feature – and to have this estimate somewhat accurate, it’s important for me to at least note that my 1974 Genesis release isn’t a first pressing, but a reissue.  And, truth be told, this is a pain to do on Discogs for several reasons:

1)     When searching for a basic record – say, Fleetwood Mac’s Rumours – 538 versions of the album pop up, and even after filtering for country (U.S.) and format (vinyl) you’re left with over 90 options to choose from.  Which one do you choose without wanting to spend a great deal of time?  If you’re like me, knowing that I didn’t have a highly-valued first pressing – I chose the first reissue I could find.  But this leads to another problem…

2)     I want to be able to track my records based on the year they were released.  My mental timeline is part of what helps me navigate my world, and knowing that The Lamb Lies Down on Broadway came out in 1974 is one of those facts that anchors my historical timeline.  Unfortunately, if I want to properly recognize that I don’t own a valuable first pressing but rather an inexpensive reissue, it’s the year of the pressing that pops up when I chronologically order my collection, NOT the year the album was released.  I hate this.  Others hate it too, as a quick Google search confirmed, but while there are many likeminded people out there, there’s apparently only one solution to the problem:  download your collection, load it onto a spreadsheet, and physically change the dates to their original year of release.  That’s what I did.  Not ideal.

3)     Unless I’m missing something, I can’t set filtering defaults like searching only for vinyl releases in the U.S.  I have to tell Discogs to search only for “vinyl” and for “U.S. releases” every time search for a new record.  EVERY fricking time!  If I’m missing something, shame on me.  But this made entering data much more laborious.  And using the website is no better than the android app, as it takes a long time to even load the filtering page.  To date, there isn’t a Discogs app for PCs.  You have to go to the website if you want to make changes via your computer.  (I tried using “Disko for Discogs” which is supposed to be a way to use Discogs via an app, but this failed to even link up to my account).

These issues aside, Discogs is still a useful way to inventory of your collection, and if you own more recent CDs and albums, it’s easier still, as you can simply scan the barcode rather than typing in information (I entered my entire CD collection in less than a day).  Now that I’ve got everything entered and up to date, going forward when I purchase a new record, I’ll enter it separately onto Discogs and then onto the spreadsheet I’ve made to my preferred specifications.  Luckily for me, I only purchase 30 or 40 records a year, so this isn’t such a big deal.  If you’re a big collector with a lot of changes in inventory, this could be a major headache.   In addition to editing “year released” on my spreadsheet, I also manually edited the format of my items into basic categories (LPs, CDs and DVDs) and added a genre column (rock/pop, jazz, classical, spoken, humor).  This way I can sort my collection in any way I choose. (A question might be raised as to why I would feel compelled to sort my collection in multiple ways.  Again, it’s all about the illusion of control.)  The spreadsheet also serves as a way to enter albums that Disccogs can’t find – limited releases or self-released CDs that friends of mine have given to me over the years, for example. 

With everything entered, I’ve got upwards of 900 vinyl records and 500 CDs.  That’s a lot for sure, but each item is neatly arranged in the racks I built last spring, and as a result my mild obsession doesn’t seem like such a crazy endeavor.  When my records were stacked in boxes sprawled out on the basement floor, then I wondered if my collecting was getting out of hand.  Now if I ever feel this way, I need only look to a collecting friend of mine who’s amassed more than 5000 records.  Compared to him, my hobby seems downright sane.

Build Your Own Record Rack

I’m not a naturally handy guy, but over the years I’ve managed to take on some modest home improvement projects with a degree of success, mostly the result of YouTube videos and frantic emails to my exceptionally handy friend, Rick.  Last March when it became apparent that the pandemic would result in a lot of unwanted time at home, I decided to overcome my typical trepidation and take on a new project, one I’d been grappling with for some time:  building a few shelving units to store my growing collection of vinyl records.  I’d been searching for a replacement of my plastic-bins-scattered-around-the-basement approach for quite some time, but nothing on the market satisfied my three criteria:  forward facing, attractive and inexpensive. 

Enter, the Google search.  Actually enter dozens of Google searches. And lo and behold, several pages deep into one of my explorations, I came upon a marvelous blog post called “I Built a DIY Vinyl Record Shelf, And you Can Too!”  This sounded right up my alley.  The post was over seven years old, but the concept was timeless:  build a great-looking unit that holds around 500 records with one sheet of 8x4 plywood.  Fantastic.

The author of the blog got his idea from what is now a decade-long thread on AudioKarma, a website I’d never heard before but whose entry is a treasure trove of information from dozens of helpful contributors.  It all started with a great concept and has since evolved to include every possible variation you can imagine, with multiple draft designs that accommodate different needs.  If you’re interested in building your own rack, I strongly encourage you to read the entire thread before you begin.  I did not, and wish I had.  It may take you several hours, but it’ll help you determine in advance which features are important to you and which design works best.  Had I read these comments in full I would have avoided a few mistakes along the way.  As it is, I built two identical racks, and then a third of my own design that includes record storage on the bottom and bays for a receiver and turntable on top.  None of my three projects went perfectly, and my lack of craftsmanship certainly reared its ugly head from time to time, but I learned a lot about woodworking and ultimately made decent-looking alternatives to the plastic bins I’d been using for years.

Along with screws, glue, casters, sandpaper, and polyurethane, lights, etc., I figure each unite costs somewhere around $100.   Not too shabby!

IMG_20200415_163133223.jpg
IMG_20200615_143225240.jpg
IMG_20200615_135340799.jpg
IMG_20200414_135716145.jpg
IMG_20200615_135326304.jpg

Above: records will fill the bottom eventually. Far left: speaker stands that I built to practice using a pocket hole jig. Left: extra support for the bottom shelf.

Here are a few things you may find helpful:

1)     Beware cutting your plywood at the store.  The guys at Home Depot were well-meaning, but their cuts of my red oak plywood (around $53) with a dull an imprecise cutting tool ended up shredding my wood something fierce.  It took a lot of energy and frustration to work around the most dreadful-looking cuts.  If you have a friend with a truck or a van, consider doing this at home.

2)     Buy or build a square jig to hold your plywood together at right angles.  I built one very similar to the one in this video: https://www.youtube.com/watch?v=HPA8FDTcfcE

3)     Get a table saw or borrow one.  I did not and it showed, because even though I used a guide with my circular saw, I was never able to make my cuts absolutely perfect, resulting in slight gaps and mismeasurements that affected the final project.  I’m still happy with my units, but they could have been a bit better. 

4)     Since being able to move your record rack once it’s filled with records is key, definitely include casters in your design.  I purchased reasonably-priced 90-pound casters from Home Depot and they work fine.  Don’t forget to include a few that swivel and lock.

5)     Use a counter sink to hide your screws or use a pocket hole jig.  I did the former from the first two racks I built and pocket holes for the third unit along with a set of speaker stands I built (these actually turned out the best of all of my work).  I loved using my Kreg Pocket Hold Jig 320 and will find new uses for it in upcoming projects I’m sure.

6)     Use wood glue for all of your wood joints.

7)     Buy a bunch of clamps, including a few trigger clamps for ease of use and a few clamps that are long enough to accommodate your record bin.  I think mine are 48 inches, and they were hugely helpful.

8)     Consider adding supports for the shelves.  Records weight a lot, and though it might not have been necessary, I did add a cross-bar support for the lower shelf and perimeter supports for the top shelf.   If nothing else, they give me peace of mind.

9)     Be especially careful with the top shelf as this is the most visible.  On the last rack I made that’s housing a turntable on top, I ended up with gaps along the edges that required the use of wood putty, and it looks pretty bad.  So bad, in fact, that I decided to purchase a bunch of rock band stickers from RedBubble to hide my work!  I love the stickers, but they were not part of the original design.

10)  Which reminds me, consider decorating your racks with stickers!  This was a helluva lot of fun, and it requires no carpentry skills.

11)  If you don’t want to stain, don’t.  I personally hate using stain because I never like the way it turns out – just another one of those handyman skills I haven’t yet mastered.  I kept my red oak plywood bare and used three coats of polyurethane to protect it and give it a bit of a sheen.  Looks great.

12)  Don’t fret so much about how to best apply polyurethane.  I stressed out about this because everyone had an opinion and almost none of them were consistent.  Put a few coats on, sand lightly, put another coat on, and you’re good to go.  It’s just polyurethane.  It’s not life and death.

13)  Consider using real wood iron-on veneer.  I had no idea this product existed, but it’s another one of those great tidbits offered by the AudioKarma gang.  It’s an absolute bitch to work with in my opinion because it’s wider than the edge of the plywood and therefore needs to be trimmed.  Nothing I used – a trimmer designed specifically for this task or just good old sandpaper – worked well.  It either just folded the veneer or disrupted it enough to lift it off the plywood despite the adhesive.  I eventually got the job done and it looks great, but it was an unpleasant process. 

14)  Install LED lights for the bottom racks or your records are going to be hard to see.  This part of the project was easy!  I purchased these stick-on lights from Amazon and they work great. 

15)  Use record dividers for a professional look.  There are a bunch of options out there, mostly overpriced or formatted incorrectly, but I like the option I found at Amazon along with a white ink Sharpie.

I’m probably missing a few additional pieces of advice, but by scanning the AudioKarma thread you will have a lot of great ideas that people of shared over the years.  Happy building!

Copyright, 2024, Paul Heinz, All Right Reserved